Digi Portugal 1 Gbps + OpenWrt: Your Own Router, Better Security and Less Bufferbloat
A practical guide to replacing the Digi router with your own OpenWrt router on Digi's 500 Mbps and 1 Gbps fibre services. Configure VLAN 20, PPPoE, IPv6, firewalling, banIP and SQM/CAKE for better security and lower latency. Includes important limitations: own routers are not supported with Digi's PRO-DIGI 10 Gbps or fixed-line telephone service.
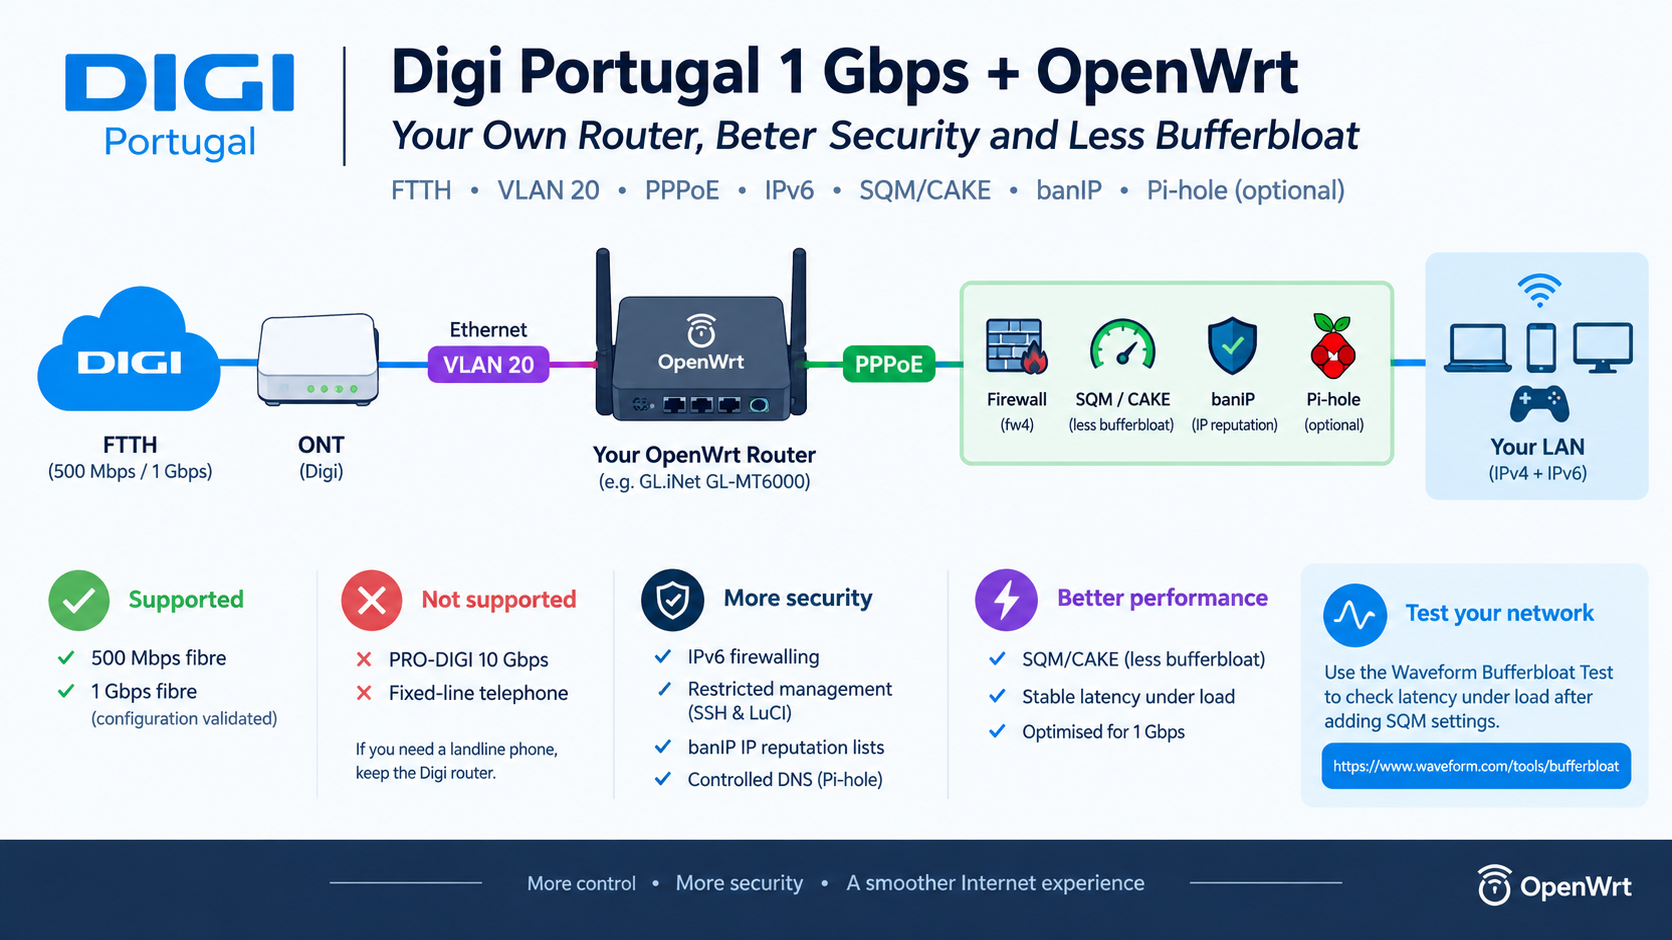
Digi Portugal 1 Gbps + OpenWrt: Your Own Router, Better Security and Less Bufferbloat
If you have Digi fibre in Portugal and subscribe to the 500 Mbps or 1 Gbps service, you can use your own OpenWrt-compatible router instead of the router supplied by Digi.
This gives you much more control over your home network: you can configure IPv6 properly, apply a stricter firewall policy, control DNS, block known malicious IP addresses, and tune the connection to reduce bufferbloat.
This guide is specifically about Digi’s supported own-router configuration for 500 Mbps and 1 Gbps fibre. The configuration described here has been validated with a Digi 1 Gbps / 1 Gbps FTTH connection.
There are two important limitations to understand before starting:
Digi’s own-router configuration is not applicable to the PRO-DIGI 10 Gbps service.
And:
Digi’s own-router configuration is not compatible with Digi’s fixed-line telephone service. If you need Digi’s landline telephone, keep using the Digi-provided router.
Digi currently documents that customers can use their own router and obtain PPPoE credentials, while explicitly excluding fixed-line telephone and PRO-DIGI 10 Gbps.
At a glance
| Digi service | Own OpenWrt router |
|---|---|
| 500 Mbps fibre | ✅ Supported |
| 1 Gbps fibre | ✅ Supported — configuration validated |
| PRO-DIGI 10 Gbps | ❌ Not applicable |
| Digi fixed-line telephone | ❌ Not compatible |
So, if you have Digi 1 Gbps fibre and don’t need the Digi landline service, this guide is for you.
If you need the Digi fixed-line telephone service, do not replace the Digi router with your own OpenWrt router.
1. Why use your own OpenWrt router?
The Digi gateway is sufficient for basic Internet access, but an OpenWrt router gives you considerably more control over your network.
With OpenWrt you can configure:
- A stateful firewall
- Proper IPv6 firewalling
- IPv6 Prefix Delegation
- CAKE/SQM for bufferbloat control
banIPIP reputation lists- DNS filtering with Pi-hole
- Restricted router management interfaces
- Custom VLANs and LAN segmentation
- More predictable network behaviour
There is also an important security consideration with IPv6.
Digi uses CGNAT for IPv4.
IPv6 works differently. Your router can receive a globally routable IPv6 prefix, and your LAN devices can receive globally routable addresses.
That means IPv6 does not provide the protection people sometimes incorrectly associate with NAT.
Instead, your firewall needs to explicitly prevent unsolicited inbound connections.
The configuration described in this article was validated on a GL.iNet GL-MT6000 running OpenWrt 25.12.5 with a Digi Portugal 1 Gbps / 1 Gbps FTTH connection. The observed configuration uses VLAN 20 on the WAN interface, followed by PPPoE with an MTU of 1492.
2. Digi 1 Gbps: the configuration this guide targets
The important distinction is between Digi’s 1 Gbps service and its newer PRO-DIGI 10 Gbps service.
Digi’s FAQ explicitly states that the own-router option is not applicable to PRO-DIGI 10 Gbps.
Therefore, this article should be understood as:
Digi 500 Mbps / 1 Gbps + your own OpenWrt router
The configuration has specifically been tested with:
Digi 1 Gbps download / 1 Gbps upload
It is not a 10 Gbps OpenWrt configuration.
Digi’s current documentation describes PRO-DIGI 10 Gbps as using XGS-PON and its own PRO-DIGI router.
Don’t assume that the VLAN/PPPoE configuration in this article can simply be transferred to that service.
3. Important: Digi fixed-line telephone is not supported
Before doing anything else, check whether you use Digi’s fixed-line telephone service.
Digi explicitly states that using your own router is not compatible with fixed-line telephone.
Therefore:
If you need Digi’s landline telephone service, do not use your own OpenWrt router. Keep the Digi router.
This is not simply a matter of configuring another option on OpenWrt.
The own-router service provided by Digi is explicitly documented as incompatible with the fixed-line telephone service.
The decision is therefore:
Do you need Digi fixed-line telephone?
                 │
          ┌──────┴──────┐
          │             │
         YES            NO
          │             │
          ▼             ▼
    Keep Digi router   OpenWrt
If you only need Internet access, you can continue with this guide.
4. Get your Digi PPPoE credentials
Digi provides PPPoE credentials for customers who want to use their own router.
Contact Digi customer support:
Ask specifically for:
PPPoE credentials to use my own router/OpenWrt router.
You should receive information including:
- PPPoE username
- PPPoE password
- VLAN ID
In the configuration described in this guide, the VLAN ID is 20.
Use the VLAN ID supplied by Digi for your connection rather than blindly assuming it is always 20.
Never publish your real PPPoE username or password.
Use placeholders such as:
YOUR_ID@digi
YOUR_PPPOE_PASSWORD
5. Configure the Digi WAN connection
There are two layers to the Digi connection:
- VLAN tagging
- PPPoE
The physical Ethernet interface carries VLAN 20, and PPPoE runs on top of that VLAN.
Conceptually:
Digi FTTH
    │
   ONT
    │
 Ethernet WAN
    │
  VLAN 20
    │
  PPPoE
    │
pppoe-wan
The exact physical interface name depends on your OpenWrt router.
On the GL-MT6000 used for this configuration, the WAN interface was eth1.
Create the VLAN
For example:
uci set network.wan_eth=device
uci set network.wan_eth.name='eth1.20'
uci set network.wan_eth.ifname='eth1'
uci set network.wan_eth.type='8021q'
uci set network.wan_eth.vid='20'
Then configure PPPoE:
uci set network.wan=interface
uci set network.wan.proto='pppoe'
uci set network.wan.device='eth1.20'
uci set network.wan.username='YOUR_ID@digi'
uci set network.wan.password='YOUR_PPPOE_PASSWORD'
uci set network.wan.ipv6='1'
Configure the LAN:
uci set network.lan=interface
uci set network.lan.proto='static'
uci set network.lan.device='br-lan'
uci set network.lan.ipaddr='192.168.1.1'
uci set network.lan.netmask='255.255.255.0'

uci commit network
Then:
ifup wan
This will briefly interrupt Internet connectivity while the PPPoE session is established.
6. Configure the IPv4 firewall
A good baseline is:
WAN:
    Input:   REJECT
    Forward: REJECT
    Masquerading: enabled
    MTU fix: enabled

LAN:
    Input:   ACCEPT
    Forward: ACCEPT

Forwarding:
    LAN → WAN
Digi uses CGNAT for its Internet connections, so the WAN IPv4 address may be in:
100.0.0.0/8
This is normal.
Check the connection:
ubus call network.interface.wan status
Then:
ping -c 3 1.1.1.1
7. Configure IPv6 correctly
Digi provides native IPv6 Prefix Delegation.
The working OpenWrt model is:
PPPoE
  │
  └── IPV6CP
        │
      DHCPv6
        │
   Prefix Delegation
        │
       LAN
        │
   Router Advertisements
        │
    LAN clients
The tested configuration received either a /56 or /64 delegated prefix, and the prefix can change after PPP reauthentication.
Configure:
uci set network.wan.ipv6='1'

uci set network.wan6=interface
uci set network.wan6.proto='dhcpv6'
uci set network.wan6.device='@wan'
uci set network.wan6.reqaddress='try'
uci set network.wan6.reqprefix='auto'
uci set network.wan6.norelease='1'
uci set network.wan6.extendprefix='1'
uci set network.wan6.auto='1'

uci set network.lan.delegate='1'
uci set network.lan.ip6assign='64'

uci commit network
Don’t configure two competing IPv6 clients
Avoid configuring:
wan.ipv6=auto
together with a separate DHCPv6 wan6 interface.
For this Digi configuration, use:
wan.ipv6=1
with one dedicated:
wan6 = DHCPv6
configuration.
8. Enable Router Advertisements
DHCPv6 Prefix Delegation on the router isn’t enough.
LAN clients need Router Advertisements to learn about the IPv6 network and default route.
Configure:
uci set dhcp.lan.dhcpv6='server'
uci set dhcp.lan.ra='server'
uci set dhcp.lan.ra_slaac='1'

uci -q delete dhcp.lan.ra_flags
uci add_list dhcp.lan.ra_flags='managed-config'
uci add_list dhcp.lan.ra_flags='other-config'

uci commit dhcp

/etc/init.d/odhcpd restart
Without:
ra='server'
the router can have IPv6 connectivity while your phones, laptops and other LAN devices don’t get a usable IPv6 path.
9. Allow DHCPv6 and ICMPv6
IPv6 relies heavily on ICMPv6.
Don’t block ICMPv6 indiscriminately.
The WAN firewall needs to allow the IPv6 traffic required for normal operation, including DHCPv6:
UDP 547 → 546
IPv6
WAN → router
The tested configuration also uses:
Allow-DHCPv6
Allow-ICMPv6-Input
Allow-ICMPv6-Forward
Check the firewall:
fw4 check
/etc/init.d/firewall reload
10. The Digi IPv6 reauthentication gotcha
One interesting behaviour observed during the setup is that IPv6 Prefix Delegation may not immediately appear even when the configuration is correct.
You may see:
solicit → advertise=0
until the PPPoE session is renewed.
After verifying the configuration, try:
ifdown wan
sleep 3
ifup wan
Then:
ubus call odhcp6c.pppoe-wan get_statistics
and:
ubus call network.interface.wan6 status
Check the LAN:
ip -6 addr show br-lan
Finally:
ping -6 -c 3 2001:4860:4860::8888
and:
ubus call dhcp ipv6ra
should show the prefix advertised to the LAN.
One important lesson:
Don’t necessarily trust the prefix displayed by the ISP portal. Verify the prefix actually delegated to your router with OpenWrt.
11. The most important security improvement: IPv6 firewalling
With IPv6, your LAN devices can receive globally routable addresses.
There is no NAT66 protecting them.
Therefore, your firewall becomes the actual security boundary.
Set the default forwarding policy to:
REJECT
For example:
uci set firewall.@defaults[0].forward='REJECT'

uci commit firewall

fw4 check
/etc/init.d/firewall reload
The desired traffic model is:
LAN → Internet
    NEW        ALLOW

Internet → LAN
    REPLY      ALLOW
    NEW        REJECT

Internet → Router
    NEW        REJECT
with only the IPv6 control traffic explicitly required by the configuration being allowed.
This is particularly important for IPv6.
If you accidentally configure:
forward = ACCEPT
globally routable IPv6 addresses on your LAN could potentially be reachable from the Internet.
12. Harden OpenWrt management
SSH should only be available from the LAN:
uci set dropbear.main.Interface='lan'
uci commit dropbear

/etc/init.d/dropbear restart
Likewise, configure LuCI so that it listens only on your LAN management address.
For example:
192.168.1.1:80
192.168.1.1:443
rather than exposing management interfaces on the WAN.
The goal is defence in depth:
Internet
   │
   X── SSH
   X── LuCI
   X── arbitrary forwarding
   │
 Firewall
   │
  LAN
13. Add banIP
OpenWrt’s banIP can provide another layer of protection by loading IP blocklists into nftables.
It can block traffic associated with known malicious, botnet, scanner or other listed IP addresses.
It is not:
- Deep packet inspection
- An antivirus
- A malware sandbox
- Protection against every attacker
- A replacement for keeping devices patched
Example configuration:
uci set banip.global.ban_enabled='1'
uci set banip.global.ban_protov4='1'
uci set banip.global.ban_protov6='1'

uci -q delete banip.global.ban_feed
uci add_list banip.global.ban_feed='doh'
uci add_list banip.global.ban_feed='firehol1'
uci add_list banip.global.ban_feed='threat'

uci commit banip

/etc/init.d/banip restart
/etc/init.d/banip status
The feed names must actually be present in ban_feed.
Check that the feeds have been loaded:
/etc/init.d/banip status
Think of this as an additional IP reputation layer rather than a complete security solution.
14. Optional: force DNS through Pi-hole
If you run Pi-hole on your LAN, you can configure OpenWrt to advertise it as the DNS server.
For example:
192.168.1.53
The setup can combine:
- DHCP DNS configuration
- IPv6 DNS configuration
- Firewall restrictions on outbound DNS
- DNS redirection
banIP’sdohfeed
One important detail:
DNS-over-TLS uses port 853, not 953.
15. Improve performance with SQM and CAKE
A 1 Gbps connection can still feel slow when it is saturated.
This is the classic bufferbloat problem.
For example:
Normal Internet usage
       │
       ▼
     Great
       │
       │ Start a large upload/download
       ▼
   Huge queues
       │
       ▼
   Ping increases
       │
       ▼
 Video calls / gaming / SSH become sluggish
OpenWrt’s SQM implementation with CAKE can control these queues.
For the validated Digi 1 Gbps / 1 Gbps configuration, the tested settings are approximately:
Download: 950 Mbps
Upload:   950 Mbps
Qdisc:    CAKE
Interface: pppoe-wan
Link layer: ethernet
Overhead: 34
Example:
uci set sqm.eth1.enabled='1'
uci set sqm.eth1.interface='pppoe-wan'
uci set sqm.eth1.download='950000'
uci set sqm.eth1.upload='950000'
uci set sqm.eth1.qdisc='cake'
uci set sqm.eth1.script='piece_of_cake.qos'
uci set sqm.eth1.linklayer='ethernet'
uci set sqm.eth1.overhead='34'

uci commit sqm

/etc/init.d/sqm restart
Important: shape the PPPoE interface
The SQM interface should be:
pppoe-wan
not simply:
eth1
Also keep flow offloading disabled when using SQM because offloading can bypass the queue discipline.
The tested configuration uses approximately 950 Mbps in both directions rather than attempting to shape at the full 1000 Mbps line rate.
16. Test your bufferbloat
After configuring SQM, don’t only run a normal speed test.
You want to see what happens to latency while the connection is busy.
A very useful tool is the Waveform Bufferbloat Test:
https://www.waveform.com/tools/bufferbloat
Run it before enabling SQM to establish a baseline.
Then enable SQM and run it again.
You’re looking for lower latency under load.
The important measurements aren’t just:
Download: 950 Mbps
Upload:   950 Mbps
You should also look at:
Idle latency
        ↓
Latency while downloading
        ↓
Latency while uploading
The goal of SQM is to keep latency under control while the connection is saturated.
You can also verify CAKE directly:
tc qdisc show dev pppoe-wan
Waveform provides the Bufferbloat test here:
https://www.waveform.com/tools/bufferbloat
17. Validation checklist
Once everything is configured, verify each layer separately.
| Test | Command / check | Expected |
|---|---|---|
| IPv4 | ifstatus wan | WAN up, PPPoE active |
| IPv6 PD | ifstatus wan6 | IPv6 prefix present |
| LAN IPv6 | ip -6 addr show br-lan | Digi global address |
| Router Advertisement | ubus call dhcp ipv6ra | LAN prefix present |
| IPv6 Internet | ping6 | Successful |
| Firewall | fw4 check | Pass |
| SQM | tc qdisc show dev pppoe-wan | CAKE active |
| Bufferbloat | Waveform test | Low latency under load |
| banIP | /etc/init.d/banip status | Feeds loaded |
18. Common problems
IPv4 works but IPv6 doesn’t
Check:
ifstatus wan6
If there is no delegated prefix, renew the PPPoE session:
ifdown wan
sleep 3
ifup wan
Also verify that DHCPv6 is allowed through the WAN firewall.
The router has IPv6 but phones and laptops don’t
Check:
uci get dhcp.lan.ra
It should be:
server
Restart:
/etc/init.d/odhcpd restart
odhcp6c shows advertise=0
Check that DHCPv6 traffic is allowed:
UDP 547 → 546
IPv6
WAN → router
Then renew the PPPoE session.
IPv6 devices appear reachable from the Internet
Check:
uci get firewall.@defaults[0].forward
It should be:
REJECT
Also verify that you haven’t created an explicit WAN → LAN forwarding rule.
SQM is enabled but latency is still terrible
Check:
tc qdisc show dev pppoe-wan
Verify:
- SQM is attached to
pppoe-wan - CAKE is being used
- Download/upload rates are realistic
- Ethernet link-layer mode is used
- Overhead is configured
- Flow offloading is disabled
banIP isn’t blocking the feeds you expected
Check that the feeds are actually configured in:
ban_feed
Then:
/etc/init.d/banip status
Confirm that the feeds have been loaded.
19. Before replacing the Digi router
Before disconnecting the Digi router, make sure:
- You have Digi 500 Mbps or 1 Gbps fibre
- You have a compatible OpenWrt router
- You have Digi PPPoE credentials
- You have the VLAN ID supplied by Digi
- You don’t require Digi fixed-line telephone service
And importantly:
- You are not using Digi PRO-DIGI 10 Gbps
The own-router configuration documented by Digi is not applicable to PRO-DIGI 10 Gbps and is not compatible with fixed-line telephone.
So the decision is simple:
Digi 500 Mbps / 1 Gbps?
        │
       YES
        │
        ▼
Need fixed-line telephone?
        │
   ┌────┴────┐
  YES       NO
   │          │
   ▼          ▼
Digi       OpenWrt
router     possible
20. Final architecture
After completing the configuration:
                         DIGI
                          │
                        FTTH
                          │
                         ONT
                          │
                     Ethernet WAN
                          │
                      VLAN 20
                          │
                        PPPoE
                          │
                    ┌────────────┐
                    │  OpenWrt   │
                    │   Router   │
                    └────────────┘
                      │    │    │
                      │    │    └── SQM / CAKE
                      │    │
                      │    └────── banIP
                      │
                Stateful fw4
                      │
             ┌────────┴────────┐
             │                 │
          IPv4 LAN          IPv6 LAN
        192.168.1.0/24       Digi /64
             │                 │
             └────────┬────────┘
                      │
                Home devices
The security model is:
                    Internet
                       │
                       ▼
                ┌─────────────┐
                │    fw4      │
                │ Stateful    │
                │ Firewall    │
                └──────┬──────┘
                       │
              ┌────────┴────────┐
              │                 │
          Established        NEW inbound
           traffic              │
              │                  X
              ▼                REJECT
             LAN
Useful Links & References
Here are the official projects, documentation and tools referenced in this guide.
DIGI Portugal
- DIGI Portugal – Customer Support — Contact DIGI to request the PPPoE credentials required when using your own router. DIGI provides support through chat, phone, email and social channels.
- DIGI Portugal – NET FAQ — Official FAQ covering fibre installation, 500 Mbps / 1 Gbps services, using your own router, CG-NAT and other network-related questions.
- DIGI Portugal – Fibre Internet — Information about DIGI’s fibre internet services and available speeds.
- DIGI – Service Status — Check for known incidents or network service issues before troubleshooting your own equipment.
Important: DIGI’s current FAQ explicitly says that using your own router is not compatible with the fixed-line telephone service and does not apply to the PRO-DIGI 10 Gbps service. If you need the DIGI landline telephone service, keep using the DIGI-provided router.
OpenWrt
- OpenWrt — The open-source router operating system used in this guide. The current stable series is OpenWrt 25.12.
- OpenWrt Documentation — Official documentation covering configuration, networking, packages and administration.
- OpenWrt Installation Guide — Instructions for installing and upgrading OpenWrt on supported hardware.
- OpenWrt SQM Documentation — Detailed information about Smart Queue Management and CAKE traffic shaping.
banIP
- OpenWrt banIP Documentation — Official documentation for banIP, including IP/CIDR blocklists, configuration and installation.
- OpenWrt Packages – banIP — banIP package source maintained as part of the OpenWrt packages repository.
banIP can be used as an additional layer of protection by blocking traffic associated with configured IP reputation and threat feeds.
Pi-hole
- Pi-hole — Network-wide DNS filtering and ad/tracker blocking. Pi-hole is optional in this setup and can be deployed separately from the OpenWrt router.
Bufferbloat & Performance Testing
- Waveform Bufferbloat Test — Use this before and after enabling SQM/CAKE to measure how much latency increases while the connection is under load. Waveform explains that its test compares idle latency with latency during active download and upload traffic.
For meaningful results, run the test under similar conditions before and after the SQM configuration. Ideally, test using a wired Ethernet connection to avoid Wi-Fi becoming the bottleneck.
Hardware
The configuration described in this article was validated on a GL.iNet GL-MT6000 running OpenWrt. Hardware-specific details may differ depending on the router you choose, particularly around Ethernet interfaces, VLAN configuration and available CPU performance.
- GL.iNet — Manufacturer of the GL-MT6000 hardware used for the validation described in this guide.
Quick Reference
| Component | Resource |
|---|---|
| ISP | DIGI Portugal |
| DIGI support | Customer Support |
| DIGI network FAQ | NET FAQ |
| Router OS | OpenWrt |
| OpenWrt documentation | Documentation |
| SQM / CAKE | OpenWrt SQM Documentation |
| IP reputation / blocking | banIP |
| DNS filtering | Pi-hole |
| Bufferbloat testing | Waveform Bufferbloat Test |
| Tested router | GL.iNet |
Conclusion
Using your own OpenWrt router with Digi FTTH gives you much more control over your network.
For the Digi 1 Gbps fibre service, this configuration has been validated using a GL.iNet GL-MT6000 running OpenWrt 25.12.5 and a 1 Gbps / 1 Gbps Digi connection.
The important pieces are:
- Obtain your Digi PPPoE credentials.
- Configure the Digi VLAN on your WAN interface.
- Run PPPoE on top of that VLAN.
- Configure IPv6 Prefix Delegation correctly.
- Enable Router Advertisements for LAN clients.
- Keep the WAN firewall restrictive.
- Explicitly reject unsolicited IPv6 forwarding.
- Restrict SSH and LuCI to the LAN.
- Optionally add
banIP. - Optionally enforce DNS through Pi-hole.
- Configure SQM/CAKE on the PPPoE interface.
- Test the result with the Waveform Bufferbloat Test.
But remember the two important boundaries:
This guide targets Digi’s 500 Mbps / 1 Gbps fibre services. It is not a guide for PRO-DIGI 10 Gbps.
And:
If you need Digi’s fixed-line telephone service, do not replace the Digi router with your own OpenWrt router.
For the supported 1 Gbps setup, OpenWrt gives you a powerful combination of router control, IPv6 security, network hardening and better latency behaviour under load.